
A roof that’s in tip-top shape is the best shield against falling debris, rain, snow, and flying and crawling pests.
But even one damaged area can quickly lead to water damage, rotted framing and sheathing, moldy ceilings, and ruined insulation. Visit https://www.bostonroofingco.com/ to learn more.
Repairing these areas can often be cheaper than replacing the entire roof.
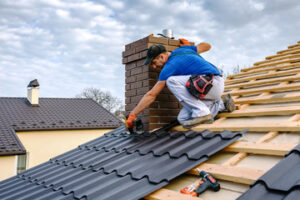
When shingles are damaged, the integrity of your roof is compromised and moisture may leak into your home. This can be due to weather conditions, general wear and tear or critters chewing through them. It is essential that you regularly inspect your roof (and make sure to use proper safety gear) and repair any shingle damage as soon as possible to avoid more costly repairs down the road.
Signs of shingle damage include piles of granules on the ground, loose shingles and cracked or broken shingles. You might also notice a black or brown streak across the roof, which is an indication of algae or moss growth and a sign that moisture is accumulating in that area.
Isolated cracked shingles are typically easy to replace, but widespread cracking is an indicator that your roof’s shingle system is reaching the end of its lifespan and could be at risk for water leaks. Moisture that accumulates in a cracked shingle can cause additional problems, including rot and mold.
The first step in repairing a damaged shingle is to climb onto the roof and examine it for obvious damage. While you are up there, you should also pay close attention to any flashing around chimneys, vents and skylights. This is a common place for water leaks to start.
If you can spot a shingle that is missing, it’s important to remove the surrounding shingles in order to properly install a replacement shingle. It’s best to do this before the rainy season, so you can be sure that your roof is sealed and waterproof.
To remove a damaged shingle, use your pry bar to slide beneath the shingle directly above the one that needs replacing. Carefully lift up the shingle, which will reveal the nail that was secured to it and should pop off easily with a little pressure. Continue this process on each shingle until you have removed all the nails that are holding down the surrounding shingles.
You can then remove the damaged shingle, cut a replacement 3-tab shingle to size with your tin snips and nail it into place. If you have time, you can apply roofing tar to the surrounding shingles to provide a sealant and further protect your roof. To camouflage the repair, you can sprinkle shingle granules from the gutter over the wet roofing tar to mask the patch.
Damaged Flashing
Flashing is thin strips of metal installed during roof construction to create a waterproof seal in areas like chimneys, vents and skylights, as well as in valleys where two different slopes meet on the roof. Flashing helps eliminate the risk of water leaks by directing water to gutters or off the roof. When flashing fails, water can seep into your home, causing wood rot, mold and significant water damage. In order to avoid such issues, it is important to regularly inspect your roof and flashing for signs of damage.
The most obvious sign of damaged flashing is a visible gap around chimneys or other installations on your roof. If you notice a hole or missing piece of flashing, it is important to contact a professional to perform roof repair immediately. Leaks during rain or a puddle on the roof may also indicate that your flashing is failing.
Other signs of flashing damage include rust or corrosion on the surface of the metal. This is caused by exposure to moisture and the elements, which can cause the galvanized coating on steel to corrode. Cracks or holes in the flashing can occur from physical damage to your roof, or from improper installation. Flashing can also be loose or detached from your roof due to weather conditions, age-related deterioration or incorrect repairs.
One of the most common reasons for flashing failure is the freeze-thaw cycle your roof experiences in the winter. During the freeze-thaw cycle, the water surrounding your flashing will expand, forcing it out of its original position and creating small gaps that can get larger over time. It is best to schedule an annual inspection with a professional roofer to ensure that your flashing is in good condition and properly protecting your home.
In addition to checking for flashing damage, it is important to regularly trim trees near your home to prevent overhanging branches that can fall on your roof or block the sun from reaching critical parts of your roof. Additionally, you should also remove snow and ice from your roof as soon as possible to prevent ice dams, which can build up and leak into your home.
Damaged Fascia
The fascia is a long, horizontal board that runs the length of your roof’s edge. Generally made from 2×6 or 2×8 lumber, the fascia supports your gutters and connects to the roof trusses. Homes that lack a fascia are rare and often against building codes. When your fascia becomes damaged, it can no longer properly support your gutters, causing them to sag or even detach. Damaged fascia also allows moisture to enter the eaves, leading to mold and mildew.
One of the most common problems with your fascia is wood rot. If your fascia boards are rotting it means that the soffit is not adequately ventilating the attic. Without proper ventilation the eaves and fascia can become damp or even covered in mold. This can then lead to fungi like moss and lichen, which eat through the boards and can penetrate your roof and exterior walls, resulting in leaks and structural weakness.
Fascias can also be damaged by pest infestation. Wood-boring insects like carpenter ants and termites can chew through the boards and cause severe damage. Other common issues with fascia include paint peeling and warping, which result from moisture damage. If you notice these signs of damage to your fascia it’s important that you take action immediately.
When you’re ready to replace your fascia boards, first paint the new lumber with a water-resistant primer and let it dry. Next, remove the existing fascia boards and clean away any caulk or paint. Before you install your new fascia, measure and cut the boards to the appropriate size. When you nail the new boards in place, make sure that they’re level and properly aligned. Finally, reattach your gutter system and make sure that it’s properly sloped to allow rainwater to drain from the eaves.
After your new fascia boards are in place, paint them with a stain or a high-quality acrylic latex paint to protect them from moisture and the elements. Be sure to choose a color that coordinates with your home’s style. To ensure that the boards last as long as possible, consider getting them professionally installed and painted to protect your investment.
Damaged Ridge Cap
Ridge caps are one of the most important aspects of your roof. They provide an extra layer of protection against water infiltration and enhance the aesthetics of your roof’s appearance. However, these essential roof components can become damaged due to natural wear and tear or harsh weather conditions. As a result, the integrity of your entire roof may be compromised. When this happens, you will need to have the ridge cap repaired or replaced immediately.
A ridge cap is a piece of shingle that covers the ridge line of a tiled roof and is typically made from the same material as the rest of the roof tiles. It is shaped to fit over the top of the ridge and can last anywhere from 10 to 30 years.
During the roof installation process, a ridge cap is usually embedded into the cement mortar that holds the rest of the roof tiles in place. Over time, this cement mortar can deteriorate, leading to gaps and cracks in the ridge capping. As a result, rainwater can leak into these open gaps and penetrate the roofing system, causing extensive damage and costly repairs.
To avoid ridge cap problems, it is important to hire a licensed and qualified roofer for the job. The best way to ensure that your roofer will do a good job is to ask for references from past clients and verify their certifications with local roofing associations. A good roofer will also offer a comprehensive warranty to back up their work.
Another preventive measure to keep in mind is regular roof inspections. These will help to identify problems and address them before they become severe. Finally, it is a good idea to install ridge vents if possible. These will facilitate ventilation, allowing hot air to escape the attic and draw in cooler air from the soffit vents. This will help regulate the attic temperature and reduce moisture levels, helping to prevent issues like mold growth.
Ridge caps are an integral part of a roof’s structure and should be protected from damage, wear and tear, and extreme weather conditions. By regularly inspecting and repairing your ridge cap, you will be able to extend its lifespan and safeguard your home from costly leaks and water infiltration.