Your roof protects you, your family, and your home from the elements. If it starts to wear out, it may be time to reroof.
The best roofing material depends on your climate and resale value. Metal offers durability and style; clay, concrete, or composite tiles fit elegant homes; and slate is the choice for upscale brick and stone houses. For professional assistance, call Roofing Company Near Me.
Slate
Slate is a metamorphic rock that has been used for centuries as roofing material. It is highly water-resistant and exceptionally durable, allowing it to last up to 100 years. It’s also quite expensive, but it is a beautiful roof option that can add a touch of class to your home. However, it’s important to hire a professional roofing contractor when installing a slate roof because it can be prone to leaks and major problems if not installed correctly.
A slate roof requires a layer of waterproof underlayment before the actual tiles are placed. The underlayment is usually a sheet of gypsum concrete or nailable masonry board. The slates are then attached to the underlayment with copper or stainless steel nails or screws, with some being nailed through the slate itself to help reinforce it. The nails are usually positioned over joints, valleys, and other areas where water might collect. It is important to properly install the slate and the underlayment to prevent damage and ensure that your roof is watertight.
While slate is a popular choice for homes in most climates, it is particularly good for snowy climes because the material is naturally insulating. It is able to keep warm air from escaping the house during the winter, and it will also reduce cooling costs in the summer. Additionally, it is highly resistant to fire.
It is also a favorite for homeowners in humid regions because it resists the growth of mildew, mold, and fungus. This means that you won’t have to worry about your roof needing to be replaced every 10–30 years like you would if it were made from an asphalt shingle.
The main drawback of slate is that it is fragile and heavy, requiring a great deal of skill to install. This is because it must be cut and fitted together to create the desired shape. This is a time-consuming process, and it’s essential to use a qualified roofing contractor.
Some people choose synthetic slate look-alikes as a cheaper alternative to natural stone roofing, but Rule cautions that these products have not been tested for longevity. He recommends choosing a roofer who can provide you with a slate sample from an existing installation and examining the color and thickness to make sure that they will not fade, curl, or deteriorate over time.
Clay
Known for their rich red coloring, clay tiles are used to add style and beauty to buildings. This roofing material has been around for hundreds of years and is known to have longevity. Clay tile roofs are also resistant to the elements, including heavy rains and strong winds. They can even withstand the dangerous ultraviolet radiation of the sun. This type of roof is an excellent choice for areas with harsh climates.
The process of creating clay tiles is similar to that of making bricks. The clay is molded into the desired shape and size and then burned at high temperatures in kilns. During this process, coloring admixtures are added to the clay to achieve different color finishes. The roof tiles are then finished with a natural clay plaster or coated with a silicone coating. This finish protects the tiles and enhances their beauty.
Although clay tile roofs are durable, they do require periodic maintenance. Regular inspections should be done to identify and repair damage. In addition, clay tiles can be brittle and may crack or break if they are walked on. It is important to hire a roofing contractor who has experience working with clay roofs.
In addition to their durability, clay tile roofs are energy efficient. They help to regulate the temperature inside a building, keeping it cool in the summer and warmer in the winter. This can result in significant savings on your energy bills.
Clay tiles are made of all-natural materials and are recyclable at the end of their lifespans. They are also fire-resistant, making them a good choice for homes in fire-prone areas. Moreover, they provide a range of aesthetic options that can increase the value and curb appeal of your home.
The disadvantage of clay tiles is that they are heavy, which can cause problems with your home’s structure and foundation. They are also not as suited to colder climates as other roofing materials. Moreover, they are not as easy to install as asphalt shingles. Hence, if you plan to replace your existing roof with clay tiles, you will need to have it reinforced and restructured to handle the additional weight.
Wood
Wood is a traditional roofing material that dates back to the earliest homes in colonial America. It remains a popular choice for modern, upscale homes and buildings where a rustic look is desired. Wood shingles and shakes are available in many tones of brown, gold, red, and amber to complement the style of the building. They may be sanded and stained or left to naturally weather into an attractive gray color.
The wood used for roofing must have high moisture and rot resistance. The preferred species are western red cedar (Thuja plicata), coastal redwood (Sequoia sempervirens), and bald cypress (Taxodium distichum). These trees have a core that contains compounds that resist moisture. This helps the wood be more dimensionally stable, which extends its lifespan.
A wood roof will last longer when it is properly maintained and protected. The amount of rainfall and the temperature will determine how quickly a wood roof degrades. For example, a wood roof in warm, wet Hawaii will last only one-fourth the time that a similarly built roof would in cool, wet western Oregon. A roof that is exposed to heavy amounts of debris from overhanging vegetation will accumulate moisture more rapidly and experience accelerated degradation.
It is important that a wooden roof be sanded and treated with a preservative every two to three years to maintain its moisture resistance. This treatment can be done with a water-based wood preservative or an oil-based product. The latter is better because it is less likely to bleed onto the roof coverings.
A well-maintained wood roof will also have a high level of insect resistance. A spray-on fire retardant can be applied to the surface of a wooden roof to meet certain fire codes. This can be done as often as every two to three years, depending on the conditions of the roof and the application method.
A well-maintained wooden roof will require more maintenance than an asphalt shingle roof. It will need to be sanded and treated with an oil-based preservative or a water-based wood preservative every two to three years to prevent it from drying and cracking. It will also need to be sprayed with a fungicide every two to three years to kill the fungi that cause rot and mold on the roof.
Metal
Most people associate metal roofs with industrial or commercial structures, but this type of roofing is also used on homes. It’s a durable option with a long lifespan, and it can be designed to look very different from traditional asphalt shingles.
Most metal roofing starts out as coils or sheets that can be cut and formed to create a variety of shapes and sizes. This flexibility makes it a popular choice for architects to incorporate into residential buildings, as they can create roofs that are both functional and beautiful.
The most common metals for roofing are steel and aluminum. Both are easy to work with, incredibly durable, and come in a wide range of finishes. Aluminum is a green choice, as it requires less energy to manufacture than other metals and can be recycled when it’s no longer needed. Steel, on the other hand, has been a mainstay in building construction for decades because it is strong, affordable, and readily available. It can also be made to mimic more expensive options like copper or zinc through paint systems that allow the panels to fade and weather over time.
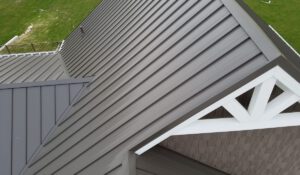
There are two main types of metal roofing: panel-based and shingle-based. Both have advantages, depending on the needs of a homeowner or business owner. Metal panel-based roofs can be prefabricated or formed on site and may have either exposed or hidden fasteners. Hidden fasteners, which have a female leg that snaps over the male leg to hide the fastener, are a more aesthetically pleasing option than exposed fasteners, which have protruding heads visible from underneath the roof surface.
A standing-seam metal roof has panels that are clipped together to form a projecting seam that runs along the length of the roof. This is a durable and attractive option, but it can be more difficult to install than a traditional shingle roof. Standing seam roofs can also be quite slippery when wet or covered in snow, which is a safety issue for anyone on the roof.
Another advantage of a metal roof is that it can be easily insulated to make a home or business more energy efficient. The insulation reflects radiant heat from the sun, which keeps a home cooler in summer and lowers energy bills.